Looking for a solution on how to view all WordPress admin user accounts in the database using phpMyAdmin and MySQL? Or do you just want to know how to delete an admin user account from the database with phpMyAdmin and MySQL?
Then nothing to see here!
Kidding! You’ve come to the right place, make yourself at home.
In this article will show you how to list and view all WordPress admin user accounts stored in the website’s database, as well as how to kill those unwanted admin accounts with fire.
Our guide is suitable for everyone, including beginners. We’ll walk you through all the steps in details and include comprehensive examples.
On a quick side note, if you want to delete WordPress ghost admin users because your website has been hacked or infected with malware, you will want to check our complete guide on how to deal with a hacked website and resolve the problem once and for all.
Note: The content in this article, including third-party products and/or services mentioned, is not sponsored, neither endorsed by OceanWP LLC. Though we may use some of the products and/or services, or we recommend some products/services based on the suggestions of the OceanWP Community, we strongly advise everyone to evaluate their options beforehand and make the best possible choice for them and their website(s).
This article has been curated with the selfless help from Denys Kovalchuk, a full-stack WordPress developer and security expert, also specialized in malware removal. If you’d like to know more about Denys or hire him to help you clean up your hacked or infected website, you can visit his profile page on Upwork.
1 Find MySQL database name
As always, first things first.
Your first task is to find the correct MySQL database name so you’ll know it’s the right one to pick on.
To find the name of the database which holds the information about the website, inspect the wp-config.php file (on your PC, through the cPanel or WP dashboard), and look for the The name of the database for WordPress section or the term DB_NAME.
The code that defines the database name looks like this:
// ** Database settings - You can get this info from your web host ** //
/** The name of the database for WordPress */
define('DB_NAME', 'yoursitename_WPU34BLA');Looking at the code example above, it’s clear that the database name related to your WordPress website would be: yoursitename_WPU34BLA.
The database name can be totally random and in no relation to your website name, your hosting account username, etc. It all depends on how your hosting provider has setup this functionality. What matters for you is to know that your database name comes after the term DB_NAME (get it, get it?).
Copy the database name in a notepad file to have it ready.
And don’t close that wp-config.php file just yet!
We need it for the next step.
2 Find the table prefix for the MySQL database
Our next step is to find the table prefix that is used for the MySQL.
To find the table prefix you need to use, check the wp-config.php file again and scroll down to the WordPress Database Table prefix section, which should like this:
/**
 * WordPress Database Table prefix.
 *
 * You can have multiple installations in one database if you give each
 * a unique prefix. Only numbers, letters, and underscores please!
 */
$table_prefix = 'wp_222blabla333_';Looking at the code example above, the information you need to copy is the: wp_222blabla333_
Again, just like with database names, table prefixes have no specific patterns and sometimes do not even include the wp_ part in them, which is the usual prefix for a WordPress database table.
On the other hand, all table prefixes are defined by the same variable: $table_prefix.
Now that we have the relevant info at hand, it’s time to launch the phpMyAdmin option.
3 Run the phpMyAdmin option
Log into your hosting account and run the phpMyAdmin option.
The location of the phpMyAdmin feature varies from hosting provider to hosting provider. Your hosting provider documentation can help you successfully navigate to it.
To speed things up for you, we included quick links for the phpMyAdmin documentation for some of the most common WordPress hosting providers:
When the phpMyAdmin interface loads, your next step is to locate the database from Step 1 in this article.
4 Locate website database using phpMyAdmin
Though there might be some visual differences, the phpMyAdmin interface looks more or less the same.
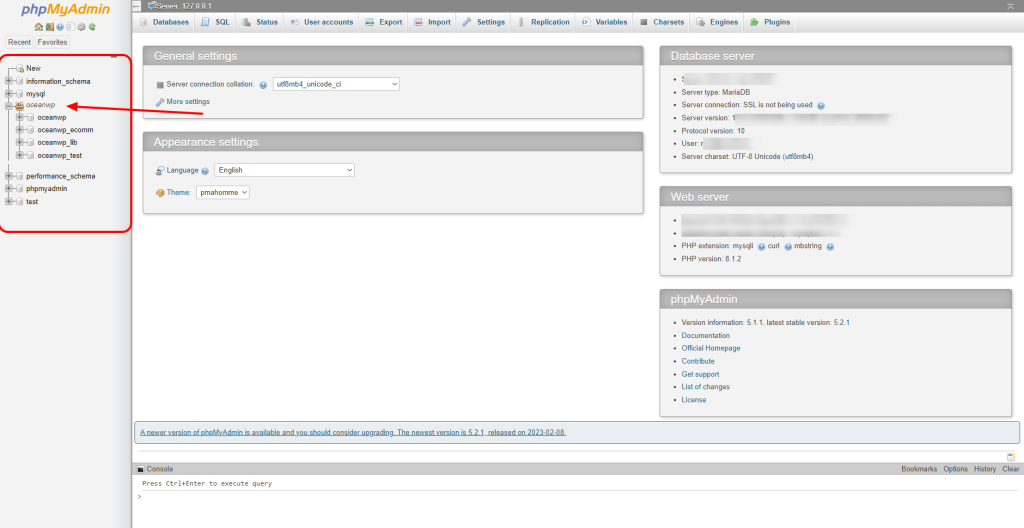
On the left side of the interface, let’s call it a sidebar, you will see a list you’re able to expand.
This list includes all databases related to your hosting account. The list also has a distinguished icon next to it that looks like a cardboard box full of files.
Usually, that list is the only option that will be available to you so there is no way you can miss it.
Expand the list and among the list of databases available, find the database name that corresponds to the name you copied in Step 1.
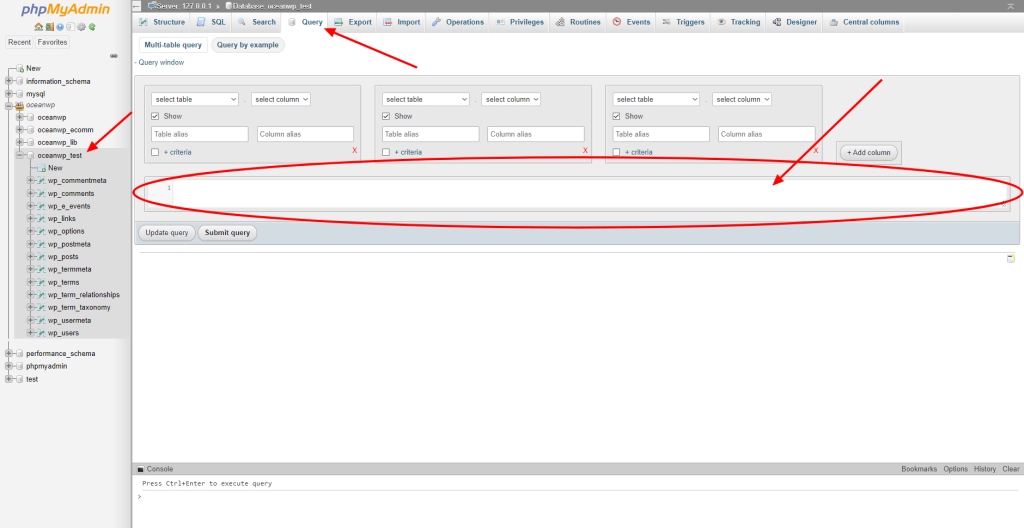
Click on the database name to load options for it.
This will enable you to run queries for that specific database.
5 Open the Query tab in phpMyAdmin
After selecting the correct database, navigate to the Query tab.
In the field intended for running SQL commands, you need to add a command that will list all administrator accounts on the server.
That SQL command should look like this:
SELECT u.ID, u.user_login, u.user_nicename, u.user_email
FROM wp_users u
INNER JOIN wp_usermeta m ON m.user_id = u.ID
WHERE m.meta_key = 'wp_capabilities'
AND m.meta_value LIKE '%administrator%'
ORDER BY u.user_registeredBe aware that the code above is incomplete and you still need to change it a bit.
Now it’s time to pull out that file where you copied the database name and table prefix.
Replace all wp_ prefixes from the example code with the table prefix related to your website aka the table prefix you copied in Step 2.
In essence, you will need to make changes to the following lines:
SELECT u.ID, u.user_login, u.user_nicename, u.user_email
FROM wp_users u
INNER JOIN wp_usermeta m ON m.user_id = u.ID
WHERE m.meta_key = 'wp_capabilities'
AND m.meta_value LIKE '%administrator%'
ORDER BY u.user_registeredTo make things even more clear, you need to alter the following:
wp_userswp_usermeta'wp_capabilities'
In this example, we would need to replace wp_ with wp_222blabla333_ (which is the sample table prefix we used in Step 2. Naturally, you’ll be using your table prefix).
When the correct table prefix is applied, the above list will turn into this:
wp_222blabla333_userswp_222blabla333_usermeta'wp_222blabla333_capabilities'
When we now apply these values to the SQL command above, the end result should look like this:
SELECT u.ID, u.user_login, u.user_nicename, u.user_email
FROM wp_222blabla333_users u
INNER JOIN wp_222blabla333_usermeta m ON m.user_id = u.ID
WHERE m.meta_key = 'wp_222blabla333_capabilities'
AND m.meta_value LIKE '%administrator%'
ORDER BY u.user_registeredRun the command by clicking the Submit Query button.
This command will list all admin users aka all users with admin privileges on your website, as well as their information like User ID, user login, email, etc.
If the results return information that includes unwanted admin users on your website, copy the ID of those users and their email address.
Now it’s time to delete the obsolete admin user profiles from the database.
6 Load the Users table in the database
To delete an admin user from the website database, navigate to the sidebar option in the phpMyAdmin interface and click to expand the database (the same database you used in Steps 1 and 4).
Scroll down the list of available tables, and find the table that corresponds to the following name: wp_users.
In your case, the prefix wp_ will be replaced with the corresponding table prefix you obtained in Step 2 of this article and applied in the Step 5 in this article.
Load the table options by clicking on the name of the table.
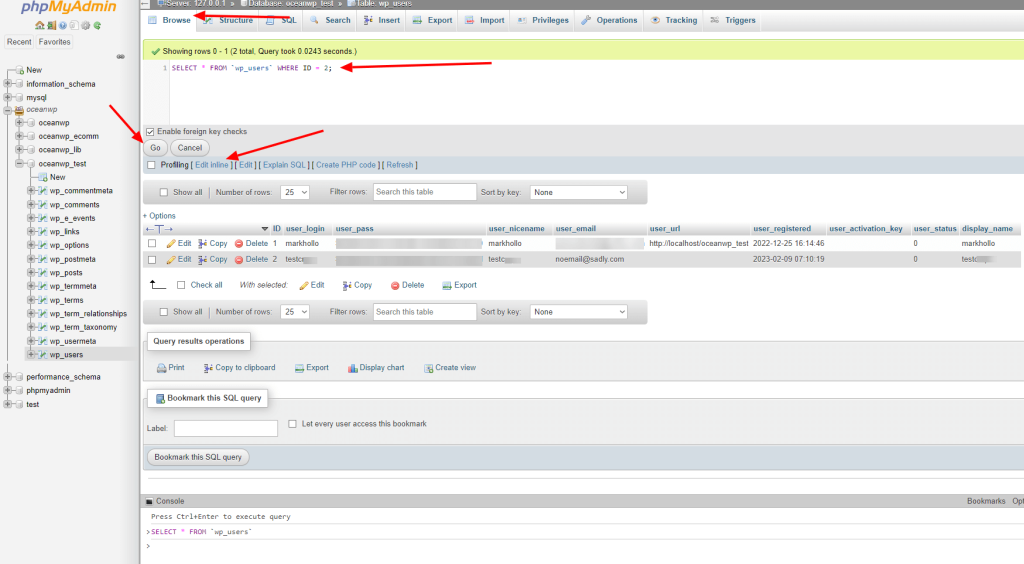
This will load the Browse tab in the phpMyAdmin interface.
7 Find a user in the database Users table
If you don’t have many users registered, or if you only have a few users registered, you won’t need to run any commands.
On the other hand, if you allow user registration on your website you’ll need to run an SQL command to find the user quickly.
At the top of the Browse tab, you’ll see a field with an SQL command look like this:
SELECT * FROM `wp_users`Again, instead of wp_users, you’ll see the option that corresponds to your table prefix.
Click on the option Edit Inline, which is displayed directly beneath that command.
By clicking Edit Inline, you’ll be able to edit the command directly. Append the following to the existing command: WHERE ID = X;
You already noticed that you won’t be making changes to the existing command text, just add more to it, so that the end command would look like this:
SELECT * FROM `wp_users` WHERE ID = X;The X in the ID = X part of the SQL command represents the ID of the user you want to delete. Use the ID obtained while listing admin user accounts in Step 5 of this article.
In short, if the user you want to find has the user ID 2, your command should look like this:
SELECT * FROM `wp_users` WHERE ID = 2;Click the Go button to execute the command.
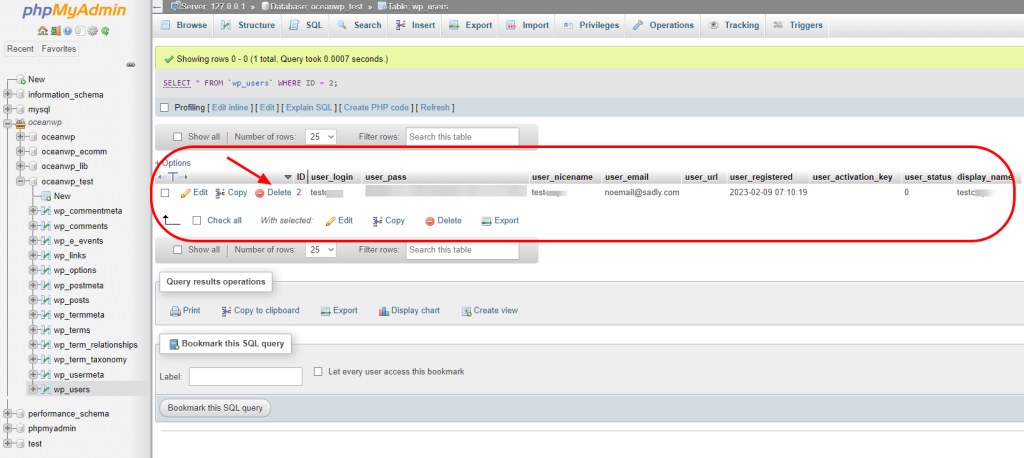
Below the query field, the results will return the user with the user ID corresponding to the value you entered.
Check if the email address corresponds to the user ID you want to remove (as a precaution measure). If everything looks ok, you can proceed and delete the selected admin user account.
8 Delete admin user account from database with phpMyAdmin
You’ve done most of the work, and deleting the selected admin user account from the database is the simplest thing to do.
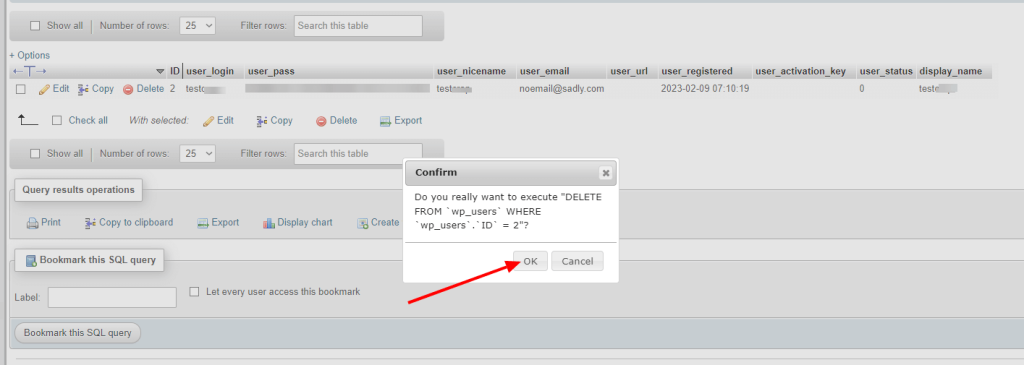
Just click on the Delete option and, as Mortal Combat used to say, finish him!
That’s it! That’s all there is to it.
But first, you’ll need to confirm your actions which gives you an extra moment to think about whether or not you want to proceed with deleting the selected account.
If you have multiple accounts to delete, simply repeat the Steps 7 and 8 in this article, and boom!
Now that you know how to view, list and delete an unwanted WordPress admin user account from the database, you can go a step further and delete all profile preferences associated with the account.
In other words, you can delete the user meta which is still stored in your database.
The Extra Mile: Delete admin user account meta preferences from the database
Though this type of information stored does not hurt your website nor your database, even after you delete a user from your website or from the database directly, some information will remain.
This information is related to what WordPress considers as user meta preferences and includes various information, such as the color scheme related to the account, the user role (subscriber, customer), etc.
Again, the account doesn’t exist any more, therefore the remaining info is completely harmless. But, you can still remove that info if you want to.
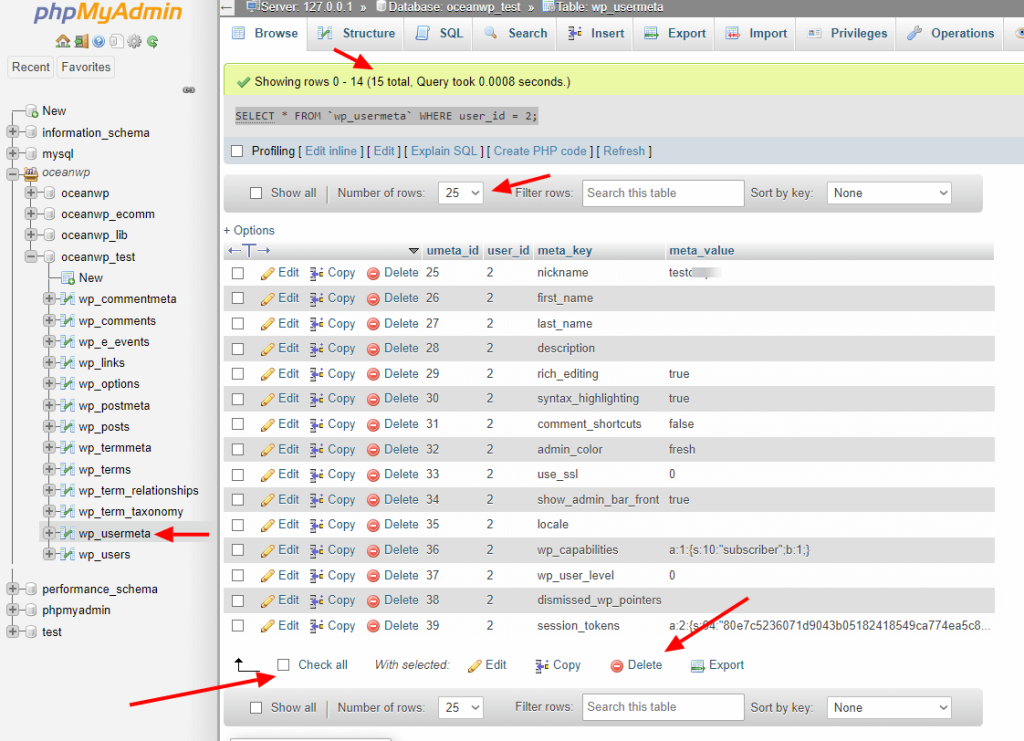
Following the same process and logic you used in Step 6 of this article to load the users table, you will now load the usermeta table in phpMyAdmin.
Hierarchically speaking, the usermeta table is usually located right above the users table in the phpMyAdmin sidebar.
And again, just like we did in Step 7 in this article, we can run a command to select a user with specific user ID by using the Edit Inline option for the usermeta table.
However, at this point, the piece of code we’ll append to the existing command will be: WHERE user_id = X;
Again, the X represents the ID of the account you previously deleted in Step 8 of this article.
In that case, if you want to select all values related to an account that had the user ID 2 assigned to it, your SQL command will look like this:
SELECT * FROM `wp_usermeta` WHERE user_id = 2;Click the Go button to run the command.
This time, you’ll see more results returned based on various settings WordPress stores in the database.
You can expand the count of the results to preview all of them, and then you can use the Select All option at the bottom of the results and the Delete option next to it (as opposed to deleting value by value).
All done!
Now close the phpMyAdmin before you start digging around 😉
Final Thoughts
Usually, deleting an admin from your website directly through the WordPress dashboard does the job well.
However, sometimes, an additional checkup is required, especially if your website has been hacked or you suspect your website may have been hacked.
The only method to view potential ghost admin accounts on your website and delete them for good is through MySQL and phpMyAdmin.
Naturally, the steps described in this article can be applied to any user role – not just website admins. You’d just need to tweak the SQL code a little bit to get the results you want or need.
In the end, if you feel this is too much for you to handle, reach out to your hosting provider support or hire a professional.
Remember, the database contains all the information about your website – not just user information.
Let us know in the comments section if this article has been helpful to you and whether you now feel confident enough to check (or even delete) unwanted accounts from your website using phpMyAdmin.

