Dealing with a hacked website? Or a WordPress website infected with malware?
Congratulations! You hit the motherload!
Just kidding. That sucks.
Though it most certainly feels like it, it’s not personal. According to an estimate done by WP Mayor, around 13K WordPress websites get hacked on a daily basis. This number includes all types of breaches.
Does this mean that WordPress is easy to hack? In general – no, but there’s a catch. When it comes to security, most of the responsibility rests with the website owner.
Since WordPress powers 43.2% of all websites in the world (a stat from January 2023), this fact makes it quite attractive for more than one reason, both to good and the bad guys.
Before you start pulling your hair out and questioning your choices, allow us to briefly remind you that security breaches happen to everyone. Including companies that have the entire Silicon Valley working for them, as well as millions invested in servers, security and more. Remember the Facebook data leakage from 2021 or the multi-year breach involving source-code leakage and malware injection at GoDaddy?
Nonetheless, these stats and facts won’t make your situation any better, especially if your website has already been hacked. But, we know one thing that is definitely going to help you handle this unholy mess like a pro.
Without wasting time on explaining types of WordPress hacks or malware, in this article we’ll walk you through absolutely all the steps on how to successfully deal with a hacked website or a website that has been infected by malware.
No steps missed – that’s a promise.
You’ll learn how to regain control over your website and perform an in-depth malware cleanup job.
As this a matter of urgency, without further ado, let’s get to it.
Note: The content in this article, including third-party products and/or services mentioned, is not sponsored, neither endorsed by OceanWP LLC. Though we may use some of the products and/or services, or we recommend some products/services based on the suggestions of the OceanWP Community, we strongly advise everyone to evaluate their options beforehand and make the best possible choice for them and their website(s).
This article has been curated with the selfless help from Denys Kovalchuk, a full-stack WordPress developer and security expert, also specialized in malware removal. If you’d like to know more about Denys or hire him to help you clean up your hacked or infected website, you can visit his profile page on Upwork.
Table of contents
- 1: Change passwords
- 2: Sort out website admin accounts
- 3: Create a full backup
- 4: Download website files
- 5: Download clean installation files
- 6: The fire sale
- 7: Check cron jobs
- 8: Upload clean installation files
- 9: Regenerate .htaccess file
- 10: Add a security option
- 11: The blacklist & blocklist check
- Caution with multiple websites
- Hack & malware cleanup: other methods
- Consider hiring a malware professional
- Conclusion
Step 1: Change passwords
Obviously, if it’s a really bad hack and you’re unable to log into not only to your website, but your hosting panel either, you’ll need to get in touch with the hosting provider support and await for their help.
Once you regain access to your hosting and website, these are all the passwords you’ll need to change:
- Hosting account password,
- FTP passwords,
- SSH passwords (if any),
- Website admin passwords.
- Though highly unlikely, if your hosting account password has also been compromised during the mess, we recommend changing your email passwords as well.
If you lack inspiration, use one of the many available online password generator tools to create a secure password you will then store somewhere safe:
- Password Generator tool by LastPass,
- Norton Password Generator, or
- Random Password Generator by Avast.
We know that using a password you can remember is the easiest thing to do – but don’t.
Further more, use a different password for each of the cases listed above.
Step 2: Sort out website admin accounts
To ensure all website admin accounts are present and accounted for, navigate to your WordPress dashboard, Users > All Users, and check the Administrator column.
First and foremost, if you see any unknown admin user accounts, delete them immediately.
Inspect each of the available and wanted admin users by editing their individual profiles:
- Log out the user if the option is displayed, then save changes.
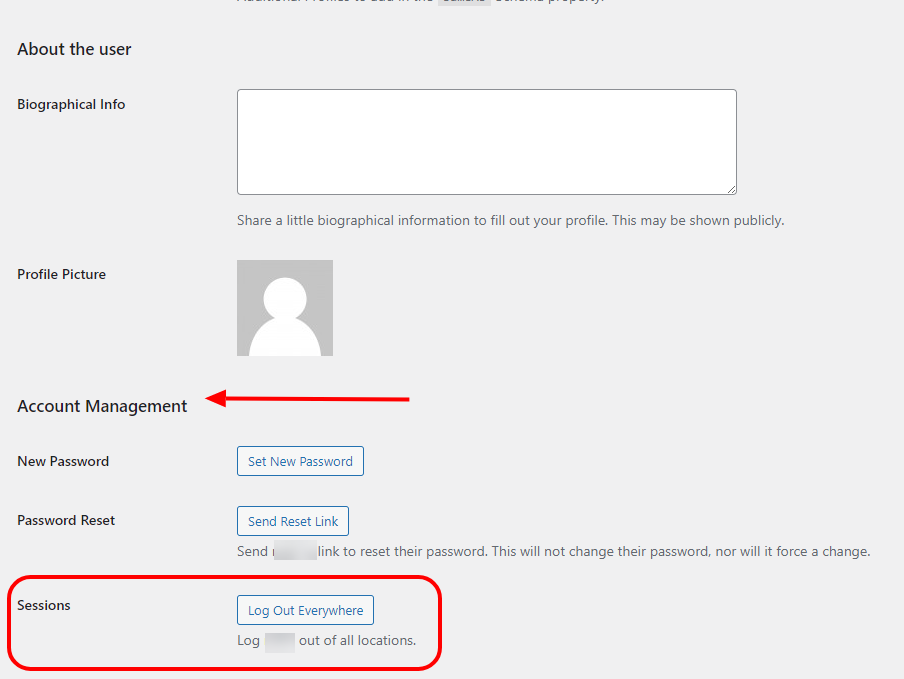
Edit the user profile and scroll down to the Account Management section.
If the user is logged in, you will see a section called Sessions and an option to log out the user from everywhere. After that, save changes and proceed with the next step.
- Ensure the email for the admin user is correct.
- Generate a new password for the admin user, then save changes. Copy / paste the generated password before saving changes. We also recommend using the WordPress password generator tool or one of the online password generator tools we provided you with above.
We also recommend performing an additional ghost admin (unwanted admin) check using phpMyAdmin and MySQL.
2.1 Additional admin intruder check using phpMyAdmin and MySQL
Using the phpMyAdmin option from your hosting account, you can perform an additional check for potential admin intruders not visible via the WP dashboard.
Don’t be surprised if the database still holds the data of the admin users you deleted from the WordPress dashboard.
You’ll still be able to delete them directly from the database.
Though phpMyAdmin is a standard option for database management, some hosting providers have custom database managers. If that is the case, it’s best to reach out to your hosting provider for support.
To learn how to manage admin user accounts, check our detailed guide on how to view and delete WordPress admin user accounts using MySQL and phpMyAdmin.
Step 3: Create a full website backup
Your hosting provider most likely includes the feature to take a full website backup.
Don’t rely solely on that.
Sometimes, due to severe website infections, the hosting backup option might not even function properly.
So, instead of just counting on your hosting for website backups, create a manual backup as well.
If you’re already using a backup plugin on your website – perfect! Use it to create a backup, which you’ll then download and store somewhere safe.
In case manual backups have not been a part of your practice, here are 3 tools to consider to help you manage your website backup locally:
Step 4: Download website files to your PC
Probably the most important thing we should emphasize in this step is: your PC will not become vulnerable in this step.
Infected and hacked website files are usually harmless when it comes to PCs (different type of malware), and are especially harmless when not executing aka just sitting around on your PC.
Might be worth mentioning that, even though you might get a suggestion to scan the hacked website files on your PC using an anti-virus – don’t bother.
To put it simply, it will not work.
Again, you’re dealing with different types of malware, not the type computer anti-virus programs are looking for.
When it comes to the website files you need to download, you’ll survive without the most. Besides, you also took a manual backup which you have downloaded.
But, there are two things you need to pay a special attention to: the wp-config.php file and the uploads folder.
4.1 Download the wp-config file
The wp-config.php file contains relevant data that enables your website to run by connecting it to the database.
Obviously, this is the file you must keep, as you will reuse it later.
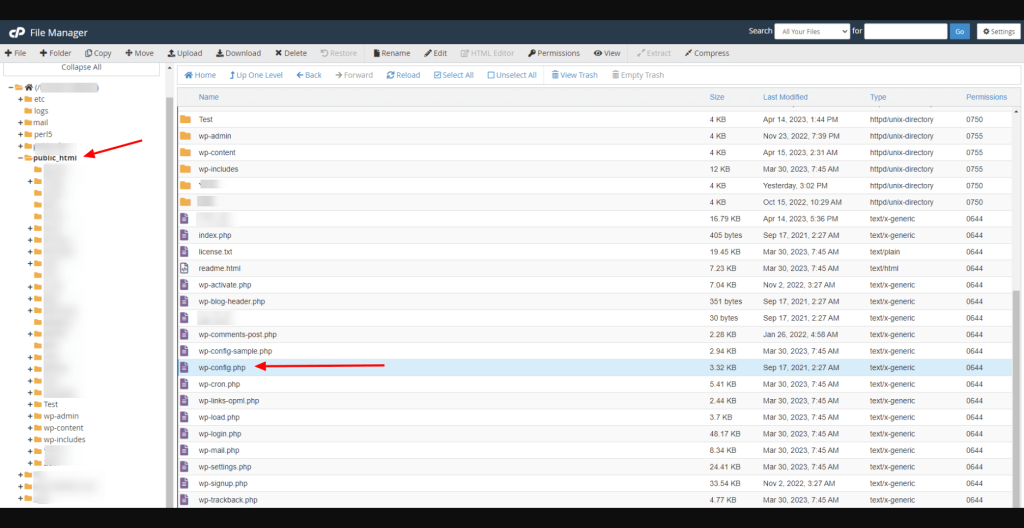
Once you download it, make sure to ask your hosting provider to inspect the file to ensure it doesn’t contain any malicious or otherwise obfuscated codes in it.
Otherwise, you’ll be doing all this work for nothing.
You may also notice a second similar file, called wp-config-sample.php. As the name says, it’s just a sample file and as such comes with the WordPress installation itself. You don’t need to keep this file.
4.2 Download the Uploads folder
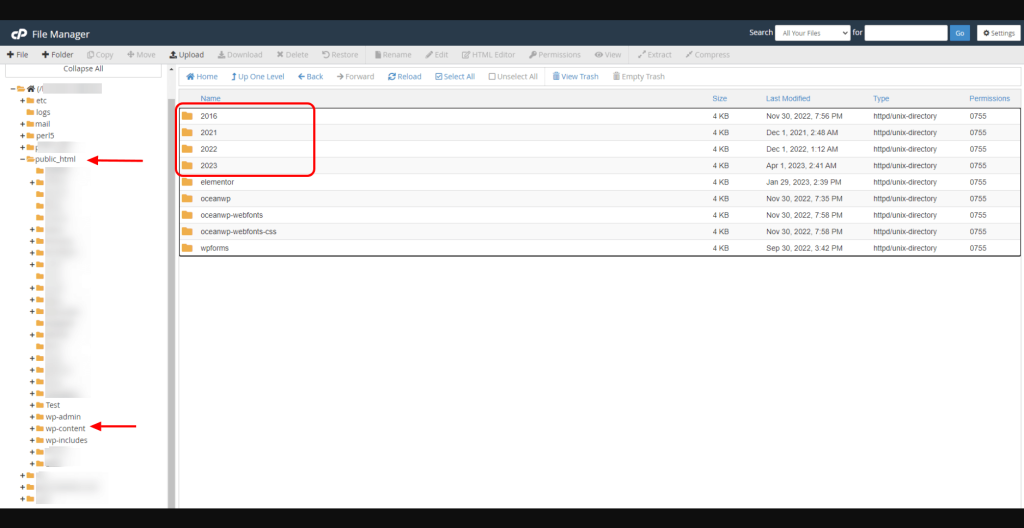
The uploads folder is located in the wp-content folder of your website’s installation.
The uploads folder contains many other folders and subfolders with all the media files you’ve ever uploaded to your website.
Hopefully, this gives you an understanding as to why it’s relevant to keep on to this folder.
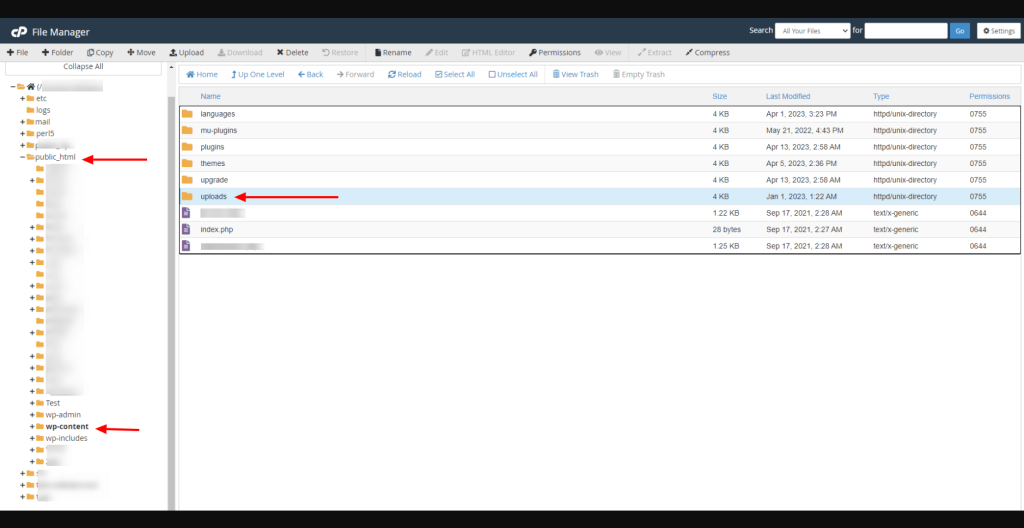
Sadly, you will need to perform a manual cleanup job in this case.
Once the uploads folder is on your PC, the first thing you should do is delete all folders that were generated by plugins or themes (such as caching plugins, for example). Don’t worry, once you start uploading things back to your website, these will be automatically regenerated.
On the other hand, your media won’t.
Which brings us to the next part – ensure the uploads folder contains only images and other media you’ve uploaded.
Spot on!
This means that you’ll need to go manually through all the folders and subfolders, and delete every index.php, .htaccess or any other file you find. In other words, delete any file that is not an image, icon or anything else you have personally uploaded to your website.
Folders containing media files (from the WordPress Media Library) are labelled by the year of creation. Example, 2023, 2021, you get the idea.
Each of these yearly folders contains subfolders which are labelled by the month of the upload. Example, 08 stands for August, 11 stands for November, etc.
Again, you only need to stick to the media folders and ignore the rest.
It’s a nasty task but extremely necessary, and also a vital part of a hacked website cleanup operation.
Step 5: Download clean installations
Now is the time to download fresh installations of all the themes and plugins you have been using, including the WordPress installation itself.
5.1 Make a list of themes and plugins
Even if you download all website files to your PC (in addition to the backup file), sometimes the theme or plugin folder names do not go in line with their official names and you may get confused.
What you need to do is simply visit the Appearance > Themes page, and create a list of themes you have installed. At least, the ones you need to use.
Looking for a quality, reliable and well maintained WordPress theme? Try the OceanWP WordPress theme today. And here’s the kicker – it’s 100% free!
Do the same for plugins, via Plugins > Installed Plugins.
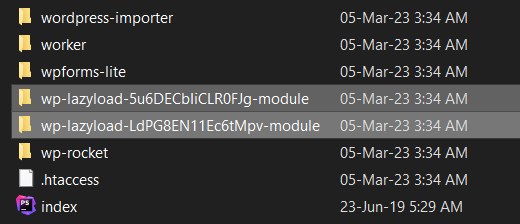
Have in mind that some plugins may have been added during the hack. If you see a plugin you did not personally install – skip it.
5.2 Download WordPress
You can download a fresh copy of WordPress directly from wordpress.org.
5.3 Download free WordPress plugins and themes
Following the WordPress download, download all free WordPress plugins and all free WordPress themes you have been using.
Now is the perfect time to evaluate your themes and plugins. If the plugin / theme has not been updated for over a year, it’s most likely an abandoned project, so consider finding a suitable replacement which is well maintained.
5.4 Download premium WordPress plugins and themes
Naturally, you’ll download premium WordPress plugin and theme files directly from your customer accounts and from respective vendors.
If you have had an ugly habit of using nulled themes or plugins aka bought premium themes and plugins off some shady websites because the price was lower or whatever the excuse, it’s a practice you need to get rid off immediately.
Step 6: The Fire Sale – everything must go
Ever wondered what it’s like to hit that red button?
Now’s your chance to experience it first hand.
Using FTP or the hosting panel, delete all files from your public (public_html) folder aka the root folder.
That’s correct – delete all. Not replace, not update – delete.
Sadly, that’s the only way to treat a hacked website. Unless, of course, you want the process to last for ages with a 99% chance of missing a malicious file.
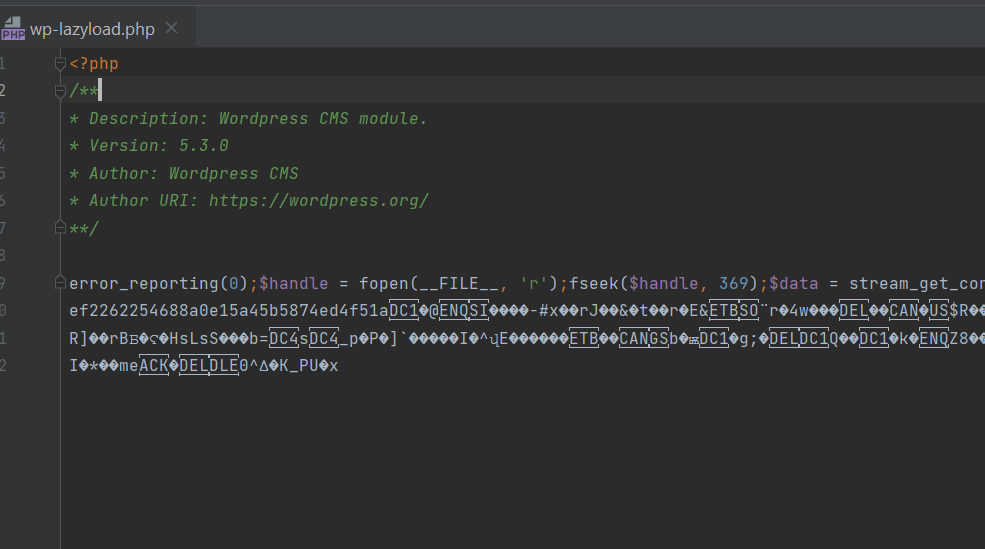
Deleting all files from a hacked website installation is the same method a professional would follow.
So, select all files and folders in the public (public_html) folder and delete them.
Now, before you start uploading clean files, you will need to check the cron jobs.
Step 7: Check cron jobs
Cron jobs are server commands used for the execution of specific tasks on your website.
For example, to run a scheduled website backup or automated plugin updates.
Some website hacks and malware can also influence cron jobs by adding new ones to the list. This means that even though you deleted everything from your website, if you miss to delete the malicious cron job, you’ve done all of it for nothing.
In short, a malicious cron job, if not removed, will just regenerate the malicious file in your website’s installation.
Check out Sucuri’s articles to learn more about malicious cron jobs in WordPress, or how attackers exploit cron jobs to keep reinfecting a website.
The best time to check for malicious cron jobs is when your server is completely empty.
Now, since cron jobs at this stage (a website with no content) are related to hosting, instead of going on this adventure alone and potentially removing a necessary cron job, we advise you to reach out to your hosting provider support and ask for their assistance on checking the cron jobs and removing everything that should not be there.
It is essential that you do not start uploading anything to your website until you’ve made sure the cron jobs task has been completed.
7.1 Reboot the website server
If you have this option available in your hosting panel, it’s recommended that you also reboot your server.
Since some types of malware can also be stored in a server’s RAM, this is especially important for everyone running their websites on VPS.
Again, if you’re unsure if you have this option available or not, or if you’re unsure on how to do it – reach out to your hosting provider support. They should be your allies on this journey.
Step 8: Upload clean files
Finally!
We’re getting to the sexy part. You’ll see the light at the end of the tunnel and it ain’t the orient express.
For the purpose of file upload, you’ll be using either FTP or the hosting panel.
Remember, when uploading folders and files either through FTP or a file manager, you need to upload extracted folders and not the .zip files.
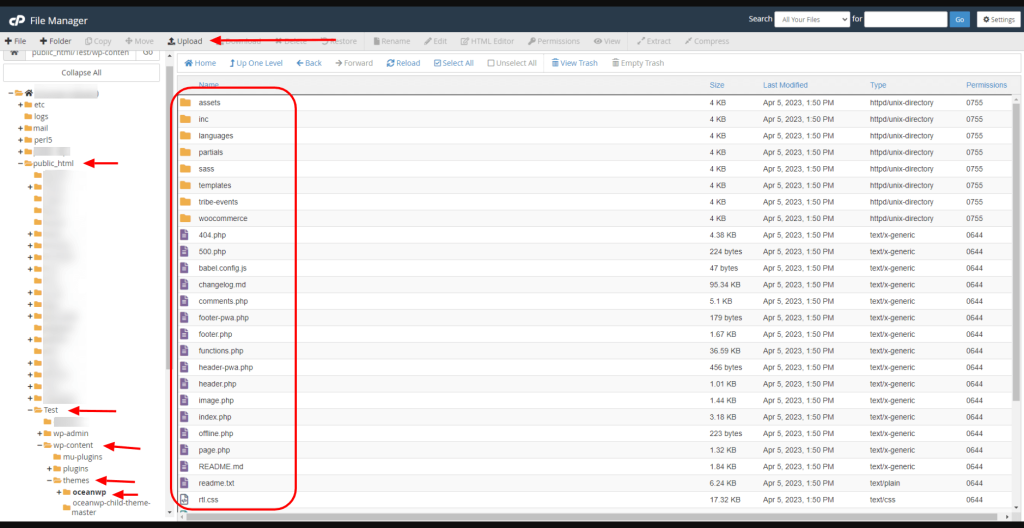
Be advised, we recommend using FTP only to upload theme and plugin files, but not the images. Images uploaded using FTP will not be displayed in the Media Library and you’ll need a special plugin to parse these files.
Some hosting providers use the cPanel File Manager, while some hosting providers have custom panels and thereby custom file managers. The interface of your file manager may differ from our screenshots.
Besides, using the hosting panel file manager to upload everything is much quicker and easier than doing it via FTP.
8.1 Upload WordPress
The first thing you’re going to do is extract the WordPress .zip folder on your PC, then upload all the contents to your public (public_html) folder.
8.2 Upload your wp-config file
Upload the wp-config.php file, the one you have downloaded in Step 4.1 of this article, to the public (public_html) folder.
8.3 Upload the uploads folder content
Though we mentioned this in Step 4, in case you missed it, before uploading the uploads folder (or its content) to your website, ensure there are no malicious files present.
8.4 Upload themes and plugins
So far so good!
You’re doing a great job, so let’s keep moving because the goal is almost near.
One of the last steps involves uploading theme and plugin files to your wp-content folder.
You can upload theme and plugin files by either using the hosting panel file manager or by logging into your website and following the traditional installation through the WordPress dashboard.
Activate the theme, activate plugins and allow yourself to be overwhelmed by a slight sense of relief.
But don’t get too relaxed, there’s still a little bit of work left.
Step 9: Regenerate the .htaccess file
Now that you’re inside your website’s admin area (WordPress dashboard) and you’ve enabled theme and plugins, it’s time to regenerate that .htaccess file.
The method is quite simple actually.
Navigate to your WP dashboard, Settings > Permalinks, ensure the permalinks structure is exactly the same as before (should be, based on the settings saved in your database), then hit the Save button a couple of times.
All done!
If you choose to create the .htaccess file manually, which is basically a plain text file (.txt), this is the default content you can use for it:
# BEGIN WordPress
<IfModule mod_rewrite.c>
RewriteEngine On
RewriteBase /
RewriteRule ^index.php$ - [L]
RewriteCond %{REQUEST_FILENAME} !-f
RewriteCond %{REQUEST_FILENAME} !-d
RewriteRule . /index.php [L]
</IfModule>
# END WordPressStep 10: Add a security option to your website
You may or may not have been using a security option before your website got hacked or infected.
If you’re reading this article because you needed instructions on how to deal with a hacked website, the chances you had no security plugin and firewall installed are above 80%.
So, let’s correct that right away.
Here’s a list of reputable and almost equally recommended security options you can use on your website:
- iThemes Security,
- Wordfence Security – Firewall, Malware Scan and Login Protection,
- MalCare WordPress Security Plugin – Malware Scanner, Cleaner, Security Firewall,
- Patchstack – WordPress & Plugins Security,
- JetPack Protect.
Which one should you choose?
Unfortunately, we can’t answer that question for you. Each website owner or developer has their own preferences for various reasons.
However, what we can tell you, in this situation you can try absolutely ALL of them (one by one), and then later decide which one suits your needs best.
That being said, do not use more than one security plugin at a time.
And, what a better way to test any or all of the security plugins, than scanning the website for any potential leftovers.
10.1 Scan website installation for potential leftovers
You’re probably thinking, wait a minute!
Why in the hell did I go through all that hassle if I could have just scanned things in the first place?!
Well, you’re right. But you’re also mostly wrong.
These security options are brilliant, but function in a certain way. Because of that, these would not be able to catch some or most of the files in your installation.
For example, fake .htaccess files.

Believe it or not, you could have thousands of malicious .htaccess files on your website, and none of the security plugins, or even your hosting provider, would report a single one of them.

And now you’re thinking – ok, a valid point.
But why do I still need to scan things even though I deleted the entire infected website installation?!
Well, because other than images, you did not delete the actual content like pages, posts, comments, and so on. The website’s content is stored in the database.
Besides creating faux blog posts, malware can also influence existing content and inject potentially harmful links, redirects, PHP and JS codes and such.
Therefore, an additional full website scan after everything you went through is still a must.
In case of potential problems, these security plugins will inform you in regards to any additional steps you need to make to resolve the remaining issues.
10.2 Last manual checks to perform
At this point, the only thing we can say to you is – you handled things like a boss!
And we’re proud of you.
You survived a hacked website and came out of the situation like a winner. But, there are a few more tasks you need to do, and that is to perform last manual checks.
10.2.1 Check blog posts
Check your blog posts and delete any content that has not been added by you or other members of your team.
Yes!
Do this even though the security plugin scan did not return any results.
10.2.2 Check comments
Check the comments section on your website and delete any unwanted content.
10.2.3 Check users
If your website is open for user registration, you also might want to check for uninvited guests.
Though it’s sometimes difficult to discern real users from fake ones, if your website was under a specific bot attack, then there are sometimes patterns in usernames created in a bulk.
Example, usernames added during a bot attack usually have grand similarities and contain specific common words, like @test or @twitter or even Elon Musk (yes, that happens as well).
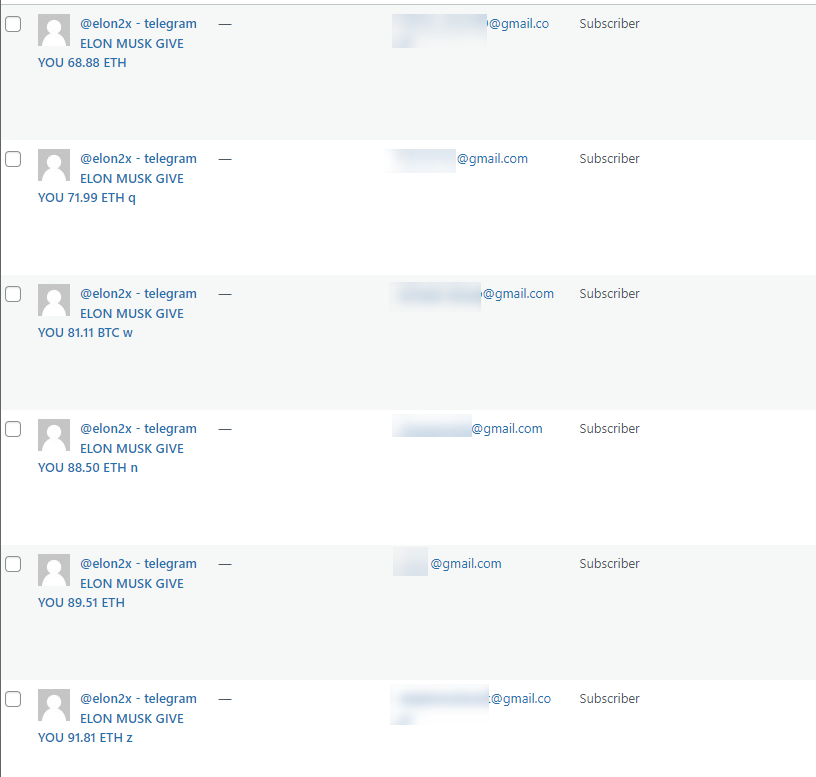
If you run into such pattern, delete all these users from your website.
Step 11: Check if your website has been blacklisted or blocklisted
If your website infection has been going on for quite some time without you noticing or if it was really a severe infection, your domain may have been blacklisted or blocklisted by search engines.
To check if your domain has been blacklisted by any of the service providers, we recommend using all of the following checking options:
Clearly, you’ll be checking your domain and hope for the best.
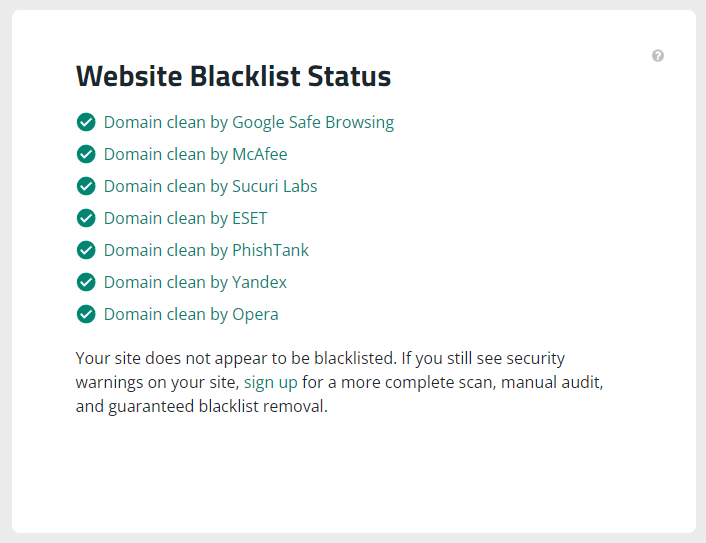
In case your website domain has indeed been blacklisted by one or all services, you’ll need to put some muscles into fixing this problem.
11.1 Remove website domain from a blacklist
If your website domain has been blacklisted, you’ll need to send a request to the service that has blacklisted you in the first place.
Of course, you’ll be able to do that only when your website has been officially cleaned.
You can send a written (email) request to remove your domain from the blacklist by contacting the service provider directly.
This False Positive Center on GitHub contains contact information for all service providers you would potentially need to reach.
Remember to be polite and good luck!
11.2 Remove website domain from blocklist
Unlike the blacklisting of the domain, the blocklist penalty is quite obvious.
A 100% indicator that your website has been blocklisted is your browser shooting out a warning when you try to visit the website’s URL (without being logged in).
The blocklist can display various warnings, but it usually revolves around the website being unsafe, containing malicious files, or that the user is at risk by visiting the website.
If your website domain has indeed been blocklisted, visit Sucuri’s guide on how to remove Google blocklist warnings.
11.3 Make peace with Google Search Console
If your website has suffered from injected content, shared links showing unknown meta titles, descriptions and images, or your GSC is reporting additional (unknown and unwanted) pages indexed – you need to make peace with the Google Search Console.
This means that you need to create a new website sitemap and resubmit it to GSC, after deleting the old sitemaps.
If your website has not been connected to GSC before, then you just need to connect it now and submit relevant sitemaps.
Of course, you’ll also need to request from GSC to recrawl your website.
The Google recrawl process can last from a couple of weeks up to months and there is no way for you to influence the speed of the process.
Now that’s all been said and done, sit patiently and wait.
Caution with multiple website installations
It’s not unusual for website owners to have multiple websites in a form of subdomains for various purposes.
It’s also not unusual that the installation files for subsites to be placed, sometimes automatically, in the main public (public_html) folder.
This means that each of these subfolders contains a WordPress installation, its own wp-config.php file, uploads folder, etc.
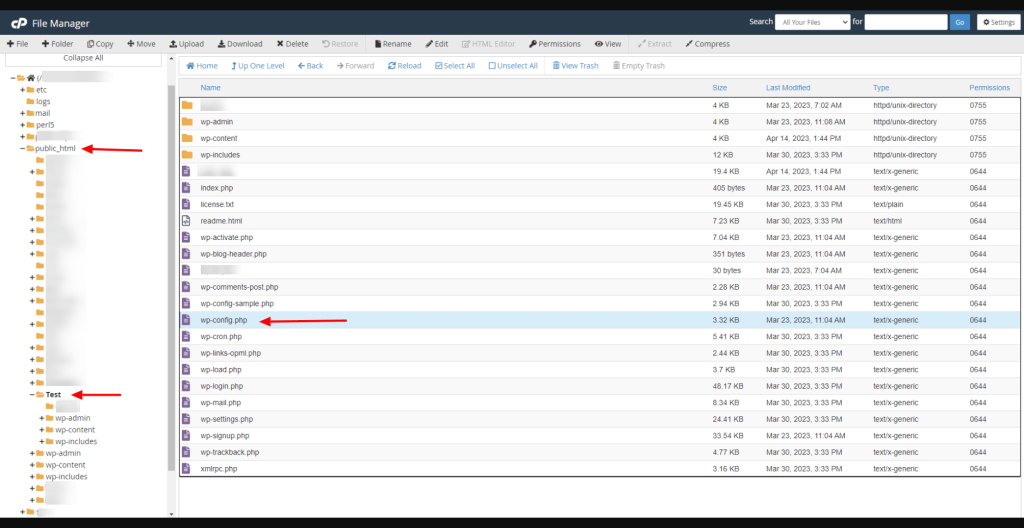
If that’s the case with you, it’s time to evaluate the relevance of these subsites.
For example, if you have had a subsite for testing purposes alone – you can delete it and create a new one.
If you decide to say goodbye to such subfolders for good, ask your hosting provider for support in removing the now obsolete databases.
You can still reuse the subdomains to create new subsites in the future.
If the subsite and its content is relevant, aka it was driving traffic and open to public, you will need to write down the subfolder’s name and repeat all the steps in this article.
Naturally, once you regenerate the main website’s installation, you will create a new folder in the public (public_html) folder with the exact name it had before, and again – repeat all the steps for that particular subfolder.
Dealing with a hacked website using other methods
There are definitely other methods of dealing with hacked websites.
On the other hand, these other methods are usually 100% manual (yes, even more manual than the guidance in this article) and take a lot of time and effort. At the same time, these methods are also the least effective ones.
For example, sometimes you’ll hear that loading a website backup will resolve the problems for you and your website will no longer be hacked or infected.
False.
The thing is – while loading a backup can temporarily restore the files that were infected during the process to their original state, the backup will not remove the actual files causing the infection.
This just means that in a couple of days tops, you’ll be dealing with the same problem all over again.
Unfortunately, unleashing the dragon in you is the only way to effectively and successfully clean a hacked or malware infected website.
Let the pros deal with it
If you believe dealing with a hacked website is too much to handle – don’t beat yourself about it.
It just means it might be best to consider other options:
- Hosting provider: some hosting providers will offer their help of cleaning an infected website for free. At the same time, some hosting providers will charge you for this service or refer you to third parties.
- Hire a professional: Though you can definitely take a little risk when it comes to web development and design, you don’t want to risk with a hacked website cleanup. Make sure to hire a reputable and experienced professional from vetted platforms and communities only, such as Upwork, Codeable, FixRunner etc.
If you’re running OceanWP on your website, you might want to look among the OceanWP Experts first.
To ensure all things have been covered by the professional you hired, you can also use this article as a guide and cross over tasks as you go.
Once your hosting provider becomes aware that your website is infected or hacked (and they will find out one way or the other), they will usually give you a 72h window-frame to deal with the situation. Take this matter seriously and with urgency. Otherwise, you risk getting your hosting account closed and entire website (and its content) deleted for good.
Final thoughts
Having your website hacked or infected with malware is, without a doubt, an ugly experience.
At the same time, it’s also a professional hazard and comes with the territory. What you need to know at all times is that it can happen to everyone and that the situation is manageable.
Even though there is no such thing as a 100% security guarantee, it’s your job as a website owner or developer to make sure you have taken all precaution measures to reduce the chances of being hacked as much as possible.
If you’re a site owner or web master, what are the steps you usually take to deal with a hacked website or malware? What do you consider to be the best security practices?
If you had the misfortune of having your website hacked, let us know in the comments if this article has helped you get your website back on tracks.

